
I this article we talk about some improvement on traditional Kali persistence disk to make it more secure and get some knowledge about the cryptography while we are at it.
What is cryptography? cryptography is all around up keeping our data safe from peeping eyes of hackers and anyone you don’t want understanding them. When we encrypt data it becomes random chunk of bits which is practically impossible to read unless you have the secret key to decrypt it. So even someone has access to the data its useless without the correct key. Now that we have a rough idea about what encryption is lets move on to some advanced things. If you need more information about symmetric and asymmetric modern ciphers refer this.
What kind of encryption do we use here on our USB drive? The encryption technique is called LUKS(Linux Unified Key Setup). LUKS has some features that makes it unique from other methods
- secure against low entropy attacks
- support for multiple keys
- effective passphrase revocation
LUKS use the key derivation function named PBKDF2 as a defense against low entropy attacks. This is also known as the two key hierarchy because its a wrap around the master key.
Lets first consider what entropy means, entropy is uncertainty of an action or an object. Computers use entropy to achieve randomness by using certain actions like mouse movements, key strokes in the cryptographic functions so they are unpredictable to attackers and guessing attacks. But sometimes the entropy is low due to the insufficient data received from the systems making the cryptographic functions vulnerable.
KDF also known as key derivation functions defend the system against the low entropy in user passwords running it through a function and making it cryptographically strong. Another purpose of this is making the password guessing CPU intensive because of the complexity of the function, making brute force attacks much harder to perform.
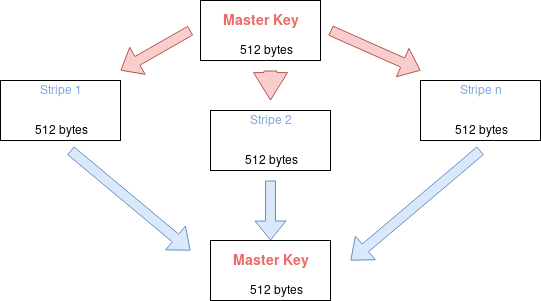
LUKS also employs an Anti Forensic splitter while storing the master key making the recovery of the master key practically impossible or at least harder if we are talking about a SSD drive. What this splitting does is scatter the parts of the master key across the hard disk these are called stripes, each stripe taking space of the master key populated with random data. If you want to construct the original key you need to assemble all the stripes together.
So whats our scary sounding self destructive function? Nope the USB doesn’t explode sorry for the disappointment, But the keys in LUKS partition header do. Now your drive is like a broken lock which can’t be opened even with the right key because there is no key to match the user entered key to verify it’s the real key. Data is lost forever unless you decide to back it up.

Now its time for the fun stuff creating the disk.
first we have to make our bootable USB and follow this guide to get it up and running.
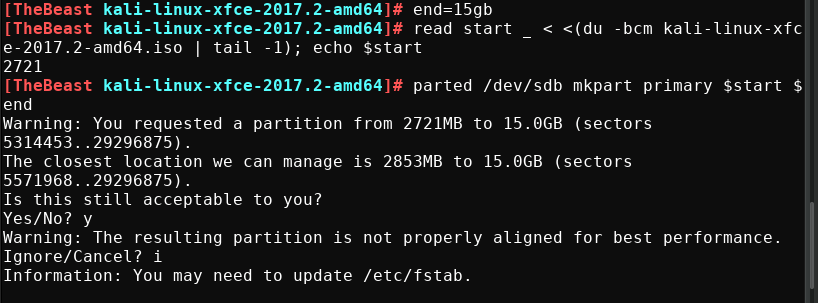
then create a new partition above the kali live partition covering the free space using parted command.
end\=7gb
read start \_ < <(du \-bcm kali-linux-2018.2\-amd64.iso | tail -1); echo $start
parted /dev/sdb mkpart primary $start $end
End of the partition, enter the size of the USB drive and parted will adjust it accordingly.
The directory and Kali image you used for imaging(open the terminal in the directory that the iso located for your convenience)
The USB drive(use f disk -l to find it out)

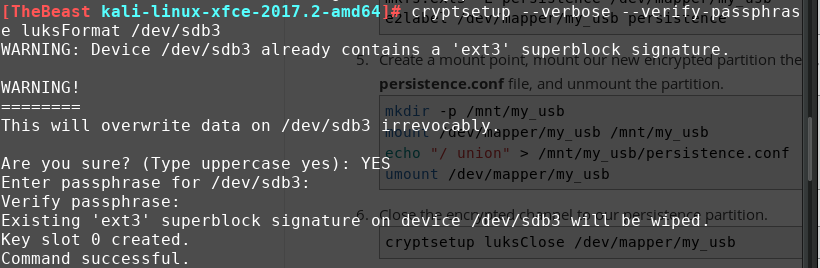
Next we initialize LUKS encryption in the partition we just created and name it as “my_usb”.
cryptsetup –verbose –verify-passphrase luksFormat /dev/sdb3
cryptsetup luksOpen /dev/sdb3 my\_usb
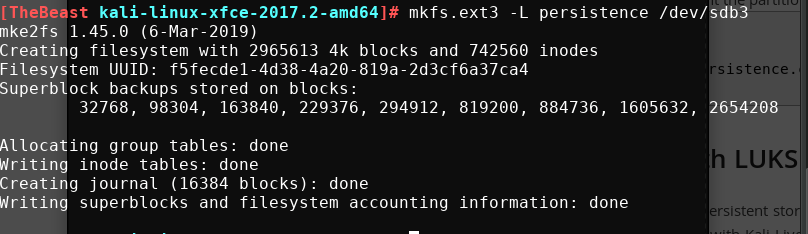
Then we make the ext3 partition and rename it as persistence. Finally we map them together.
mkfs.ext3 -L persistence /dev/mapper/my\_usb
e2label /dev/mapper/my\_usb persistence
After that we create our persistence.conf to make the drive persistent
mkdir -p /mnt/my\_usb
mount /dev/mapper/my\_usb /mnt/my\_usb
echo "/ union" > /mnt/my\_usb/persistence.conf
umount /dev/mapper/my\_usb
Finally close the encryption channel to the channel
cryptsetup luksClose /dev/mapper/my\_usb
Now lets move on to the phase two which is making the drive Nukable (self destructible in a cooler term)
Boot into the live disk and check if everything works, lets mess with “cryptsetup” a bit.
Type up the command (Use your drive encrypted for “/dev/sda5”)
cryptsetup luksDump /dev/sda5
To see a summary of the encryption of the disk and you will see one key is “Enabled” out of 8 key slots
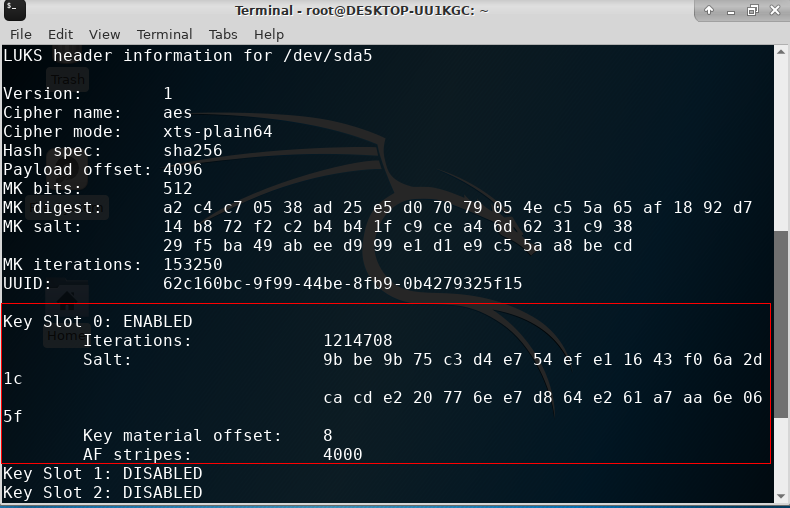
Encryption summary
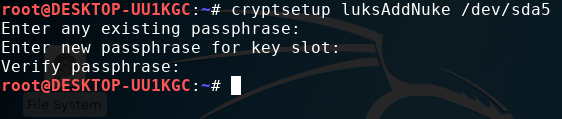
Then we can add our nuke key which is responsible for nuking and removing the LUKS header.
WARNING: Upon entering the “nuke key” data will not be accessible with any key, Unless you backed the header up.
cryptsetup luksAddNuke /dev/sda5
Nuke key
Now lets do an another luksDump and you will see there are two keys enabled now.
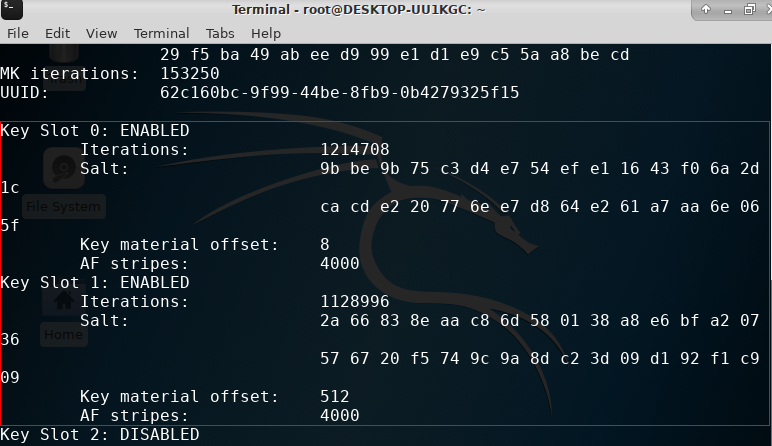
Two keys enabled
This final part is optional, as we already have our USB with expected options you can decide either to have a backup to recover from an accidental nuke or not.
Creating the backup
cryptsetup luksHeaderBackup --header-backup-file luksheader.back /dev/sda5
“luksheader.back” is the backup file

backup header
As an added option you can encrypt the luksheader.back file for more security using openssl
openssl aes-256-cbc -a -salt -in luksheader.back -out luksheader.back.enc
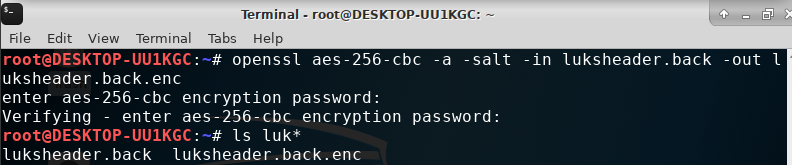
Encrypt the header
Backing up a nuked disk
openssl enc -d -aes-256-cbc -in luksheader.back.enc -out luksheader.back
cryptsetup luksHeaderRestore --header-backup-file luksheader.back /dev/sda5
Tips
Always use a password that comes before the real password for the in a word-list, In case of a brute-force attack.
And as always use strong PASSWORDS, not abc123